
How To Use Resin with LED Lights: DIY Glowing Crystal for Wearables
Are you looking for a unique and eye-catching DIY project for your next cosplay or costume design? Look no further! Creating LED crystals out of resin is a fun and creative way to add some sparkle and shine to your ensemble. Not only are LED crystals a stunning addition to any cosplay or costume, but they also make for great conversation starters at conventions or parties. This tutorial will teach you how to use resin with LEDs for wearable tech projects. I’m going to make glowing crystals, but you can use this technique for any resin project you’d like.
Watch the Video:
Materials:
First of all, you’ll need to gather your materials. I found a resin kit on Amazon which came with several molds (including the one I’ll use today) and was about 20 dollars. You also need a UV light to cure the resin, these are the same that are used in nail parlors, so if you search for “UV nail light” you’ll find what you’re looking for. The one I use was about 16 dollars.
For LEDs, I used my own wearable tech kit, which is a kit designed specifically for wearables.

The resin kit includes a variety of molds including the ones I used, and three small bottles of resin. Find it here.

My wearable tech kit is designed specifically to be used in wearable projects, and includes controllers that cycle through a variety of patterns. Get yours here.

I was drawn to the crystals because I love using crystals in designs. I’ve done several projects with crystals in the past, including this necklace designed for an opera singer, but I’ve usually used readymade gems or real quartz and glued the lights into them. This hasn’t been very durable and I’ve had problems with the gems coming off. With the resin we’re able to solve that problem, plus have the ability to customize our design.
DIY LED Crystal Tutorial: How to Create Sparkling Accents for Your Cosplay or Costume Design
Fill the Mold
I’ll start with the pendant necklace. Fill up the mold with resin nearly to the top. Ensure that it is full enough that the LED will stick, but not so full that it will overflow.

Place the LED
Next, put the LED directly into the resin. Once the LED is in place, deposit a bit more resin on top. This will ensure the LED is completely encased and very secure.

Cure the Resin
Next, it’s time to cure. Put the UV lamp directly over the resin. I was lucky that mine was just tall enough for the mold I was using. The curing time will depend on the size of the mold. For this design it took about one minute to be completely firm.

Remove from Mold
Once you’re certain that it’s fully cured, carefully remove the mold, and you’re done!

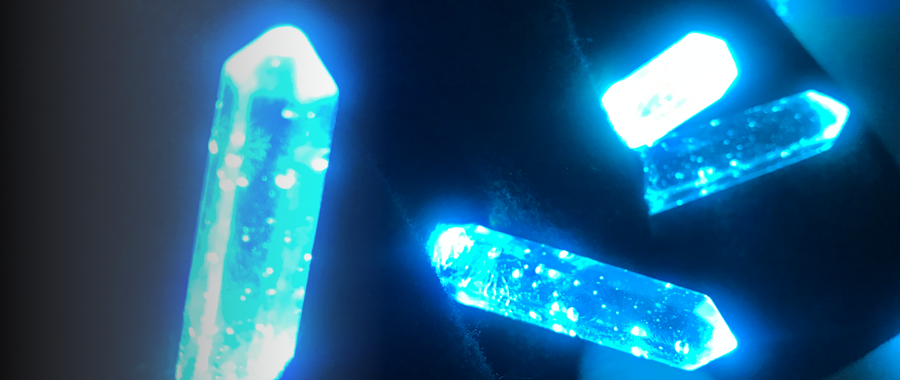
I was really happy with how this turned out and how the light diffused throughout the crystal point. With my kit there are several settings including “pulse” and rotating colors. The effect in the crystals was very unique (in my opinion).


As I mentioned in the beginning of the project, you can use color or glitter additives to enhance your designs. I was happy with the clear resin for this project, but there are a lot of possibilities. My plan is to use these crystals in a fashiontech design by having them poke out from underneath the fabric. I have some ideas for the final project already, so stay tuned to see the final project.
With a little bit of creativity and some basic materials, you can create amazing LED crystals that will make your costume or cosplay design stand out from the rest. Whether you are looking for some LED cosplay ideas or just want to add some shine to your outfit, LED crystals are a fun and easy DIY project to try. We’d love to see your results: tag us on instagram at @wearabletutorials to be featured.


